Contact Us
How to install Fiberglass Pipe Insulation?
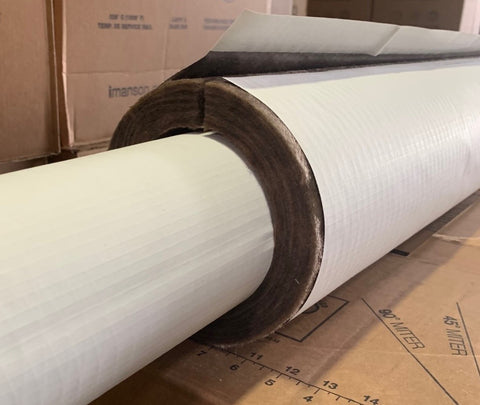
Fiberglass Pipe Insulation is very easy to install and comes with everything you need to insulate a straight pipe. The fiberglass pipe insulation piece comes pre-split in two longitudinal sections and is held together with a white All-Service-Jacket (ASJ) which has a self-sealing-lap (SSL). The pre-slit system allows for the pipe insulation to easily snap around the pipe and then pull the easy release tape to seal the section of pipe insulation. There will always be a gap between two adjoining pieces of fiberglass pipe insulation but each piece of fiberglass pipe insulation comes with a piece of lap tape to seal those butt-edge joints. Your fiberglass pipe insulation system should be sealed so that it is only showing the white jacket. If you do not see any fiberglass exposed you have correctly installed your system.
When you get to a turn in your straight pipe (90 degree, 45 degree, or Tee ) you will need to select a PVC Fitting Cover to go over the welded or screwed pipe fitting. First you need to select the right size. You can use this chart here for Iron Pipes (there is a different chart for Copper Pipes):
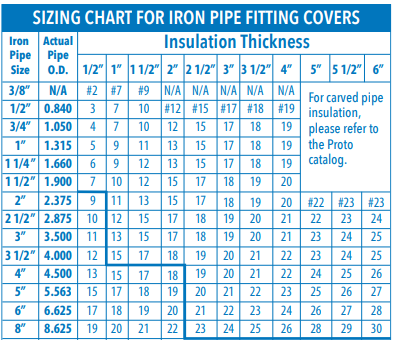
The reason that PVC Fitting Covers are sized in numbers is that different combinations of Pipe Size and Insulation Thickness can use the same PVC Fitting Cover size. For example, 2” Iron Pipe Size x 2” Insulation Thickness (2”+2”+2” = 6” Diameter ) fits the same size as 4” Iron Pipe Size x 1” Insulation Thickness (4”+1”+1”=6” Diameter). As a result, you would order the size #15 for both 2x2 and 4x1.
The PVC Fitting Cover will come with a loose piece of white fiberglass insulation to wrap around the fitting and then the pre-formed, molded PVC Fitting Cover will be bent around the pipe fitting and should wrap around the fiberglass pipe insulation on both ends of the PVC Fitting Cover. The PVC Fitting Cover can be closed with stainless steel tacks and/or PVC tape. If you are using PVC Fitting Covers for a chilled water application, remember to seal the seams with a vapor barrier tape matching your pipe insulation or there could be a break in your vapor barrier.
Now for the difficult stuff: what if you run into a union or valve that the fiberglass pipe insulation cannot slide over? Typically an insulation contractor will use a piece of oversized pipe insulation that will slide right over the current size pipe insulation that you are using. For example, if you are insulating a 2” Iron Pipe with 1” thick fiberglass pipe insulation, you would need to select a piece of 4” IPS Size to slide over the 2” IPS x 1” thick fiberglass pipe insulation size (2” + 1” thickness on one side + 1” thickness on the second side = 4” outside diameter).
Once you use a piece of “oversized” pipe insulation you will have some fiberglass exposed without the vapor barrier on the butt-ends of the pipe insulation piece. You will need to paint the ends with a weather barrier mastic (CP-10) if you are insulating a heating system or a vapor barrier mastic (CP35) if you are insulating a chilled water system.
For an indoor system, this should complete any basic fiberglass pipe insulation system. Remember, “if you see all white you did it right!”