Contact Us
How to choose the correct pipe insulation thickness?
Selecting the correct pipe insulation thickness for your home or commercial project can be confusing. The selection process differs if you are insulating your pipes for heat loss (a hot water process) or condensation (chilled water pipe). Let’s start with pipe insulation for heat loss application:
Heat Loss:
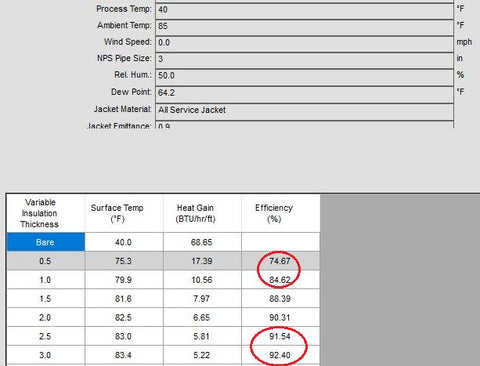
Pipe insulation should be viewed as an investment where you will receive a certain payback period based on the reduction of your energy bills. It is true that the thicker the pipe insulation, the less heat will escape from your pipes and the more energy will be conserved which will in turn save you more money but that doesn’t mean you should purchase the thickest pipe insulation you can find. As the insulation gets thicker, the difference in energy efficiency savings gets smaller while the cost of the pipe insulation gets more expensive the thicker your pipe insulation. In the example below, a jump from ½” pipe insulation thickness to 1” pipe insulation your thickness increases your efficiency a full 10% (from 74.67% to 84.62%) and, as a result, should provide a faster payback period for your project. In the same example below, if you jump from 2.5” pipe insulation thickness to 3” pipe insulation thickness your efficiency only changes 1% (from 91.54% to 92.40%). The 1% change in efficiency will take a long time to payback the cost difference from 2.5” pipe insulation thickness to 3” pipe insulation thickness.
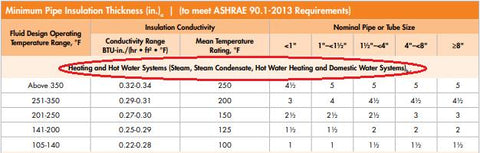
Thankfully, most pipe insulation product data sheets have a recommended pipe insulation thickness chart based on ASHRAE standards based on your pipe size and your application temperatures and does most of the decision making for you. Here is an example of this ASHRAE chart:
Condensation:
Choosing the correct thickness for a chilled water application is more important than a heat loss application because the wrong thickness will ultimately result in condensation which could damage your pipe insulation, cause corrosion on your pipe, and lead to mold on the pipe insulation and/or surrounding area.
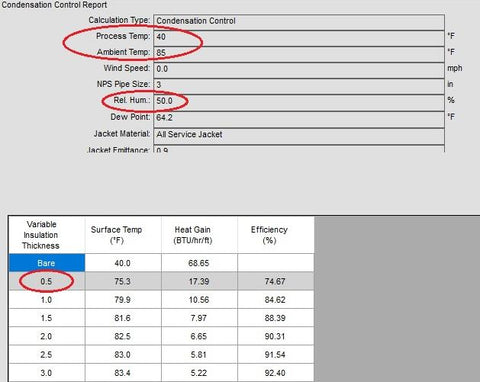
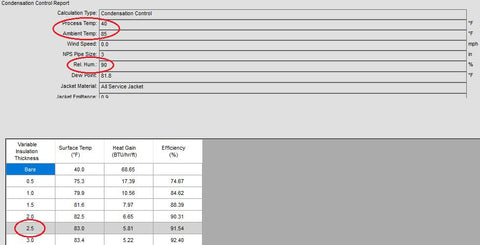
When controlling condensation with pipe insulation another element besides processing temperature (the temperature of the water inside the pipe) and ambient temperature (the temperature in the room/outdoors where the pipe is located) needs to be considered and that is relative humidity. If your pipe insulation is in an environment that typically has 50% relative humidity but it is an extremely humid day and you have opened the windows, your relative humidity could increase to 90% which requires a drastically different pipe insulation thickness to protect from condensation. Please see the charts below as an example for the differences in pipe insulation thicknesses when humidity changes.
50% Relative Humidity requires ½” pipe insulation thickness in this case:
Here is the same example with only the humidity conditions changing from 50% to 90% relative humidity. The pipe insulation thickness required drastically increases to 2.5” pipe insulation thickness:
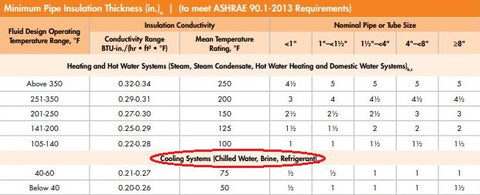
As a result, always prepare for the most extreme temperature changes when selecting an insulation thickness. Thankfully, ASHRAE also has recommended pipe insulation thickness published for chilled water applications to help you decide which insulation thickness to choose which can be found on most pipe insulation manufacturer’s data sheets as well. Here is an example of ASHRAE recommended thicknesses for cooling systems: